- Top Results
- Bosch Sensortec Community
- Learn
- Knowledge base
- BME680 gas sensor series design guide
BME680 gas sensor series design guide
- Subscribe to RSS Feed
- Mark as New
- Mark as Read
- Bookmark
- Subscribe
- Printer Friendly Page
- Report Inappropriate Content
Product Overview
The main characteristics of the BME680 are described below:
Key features
- 3.0 mm x 3.0 mm x 0.93 mm, metal lid LGA package
- Digital interface I²C (up to 3.4 MHz) and SPI (3 and 4-wire, up to 10 MHz)
- Supply voltage
- VDD main supply voltage range: 1.71 V - 3.6 V
- VDDIO interface voltage range: 1.2 V - 3.6 V
- Current consumption
- 2.1 μA at 1 Hz humidity and temperature
- 3.1 μA at 1 Hz pressure and temperature
- 3.7 μA at 1 Hz humidity, pressure and temperature
- 0.09‒12 mA for p/h/T/gas depending on operation mode
- 0,15 μA in sleep mode
- Operating range: -40 to +85 °C, 0 - 100% r.H., 300 - 1100 hPa
- Individual humidity, pressure and gas sensors can be operated independently
- RoHS compliant, halogen-free, MSL1
Furthermore here some performance parameters:
Key parameters for gas sensor | |
Response time (𝜏33−63%) | < 1 s (for new sensors) |
Power consumption | < 0.1 mA in ultra-low power mode |
Output data processing | direct indoor air quality (IAQ) index output |
Key parameters for humidity sensor | |
Response time (𝜏0−63%) | ~8 s |
Accuracy tolerance | ±3% r.H. |
Hysteresis | ±1.5% r.H. |
Key parameters for temperature sensor | |
RMS Noise | 0.12 Pa, equiv. to 1.7 cm |
Offset temperature coefficient | ±1.3 Pa/K, equiv. to ±10.9 cm at 1 °C temperature change |
Available evaluation tools and software
To best evaluate the product from the BME68x faminly
Sensor shuttle board
Reference design
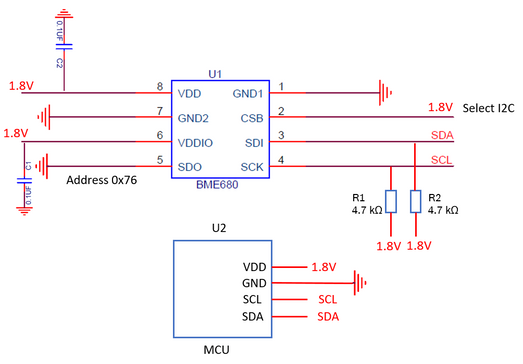
Figure 1 shows the complete schematic for a typical use case.
Figure 1: Mockup reference design
Bill of materials
Table 2 lists the bill of necessary materials.
Value | Part number | Qty | RefDes | Name |
0.1uF | C0402 | 2 | C1, C2 | Capacitor |
4.7 kΩ | R0402 | 2 | R1, R2 | Resistor |
Table 2: Bill of materials
Layout recommendations
Landing Pattern
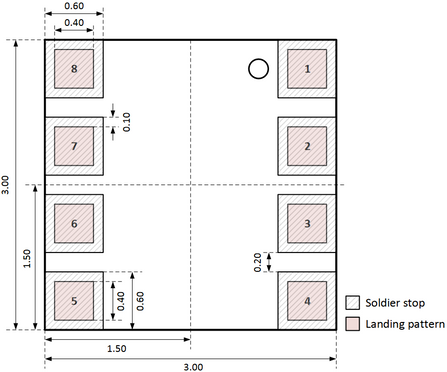
For the design of the landing pattern, the dimensions shown in Figure 2 are recommended. It is important to note that areas marked in red are exposed PCB metal pads.
In case of a solder mask defined (SMD) PCB process, the land dimensions should be defined by solder mask openings. The underlying metal pads are larger than these openings.
In case of a non-solder mask defined (NSMD) PCB process, the land dimensions should be defined in the metal layer. The mask openings are larger than these metal pads.
Figure 2: Recommended landing pattern (top view, in mm)
Typical Layout
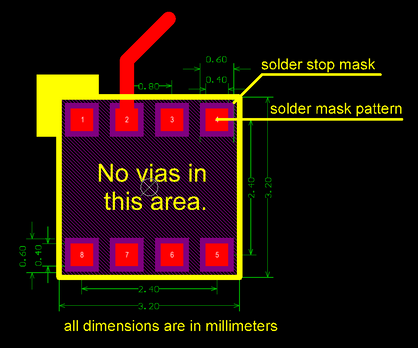
Figure 3 shows the typical layout.
Figure 3: Typical layout
Manufacturing notes
Table 3 lists some recommendations for the manufacture.
Parameter | Value |
PCB thickness | 1.6mm |
Solder paste type | 3.0Ag/0.5Cu/Remain Sn |
Paste mask stencil thickness | 100um |
Peak reflow temperature | 260°C |
Table 3: Manufacture recommendation
First power-on
After powering the sensor for the first time, the initial specs would be to test for communication with the device. This can be done simply by reading the chip identification code in the register 0xD0. See below for the expected values:
Device | Chip ID |
BME680 | 0x61 |
Table 5: Chip ID of the BME68x product family.
Here is some sample code on how to perform this test, based on BME680, using the COINES software as the host.
/*!
 * @brief This internal API is used to initializes the bme680 sensor with default
 * settings like power mode and OSRS settings
 *
 * @param[in] void
 *
 * @return void
 *
 */
static void init_bme680(void)
{
    int8_t rslt;
    rslt = bme680_init(&bme680Dev);
    if (rslt == BME680_OK)
    {
        printf("BME680 Initialization Success!\n");
        printf("Chip ID 0x%x\n", bme680Dev.chip_id);
        fflush(stdout);
    }
    else
    {
        printf("Chip Initialization failure !\n");
        fflush(stdout);
        exit(COINES_E_FAILURE);
    }
How to test the sensor’s functionality
The BME680 is a digital 4-in-1 sensor with gas, humidity, pressure and temperature measurement based on proven sensing principles. In order to verify the functionality of new sensors after soldering, an example self test code is available based on BME680 API.
The self-test starts by performing a soft reset of the device. After this, Chip-ID and trimming data are read and verified. Then temperature, pressure and humidity sensor signals are measured and compared against customisable plausibility limits. For Gas sensor the heater and gas sensor resistance are checked. For more information on self test please refer to the BME680 self test application note.
A sample code on how to perform this self-test for BME680 is available on Github.
https://github.com/BoschSensortec/BME680_driver/tree/master/Self test
Usage
The COINES installation provides sample code on how to turn on the sensor, configure it and read out the sensor data. it can be found under the installation directory on examples\c\bme680
Sample code
The COINES installation includes an example code for using BSEC library with BME680.
/*!
 *  @brief Main Function where the execution getting started to test the code.
 *
 *  @param[in] argc
 *  @param[in] argv
 *
 *  @return status
 *
 */
int main(int argc, char *argv[])
{
    return_values_init ret_bsec;
    int16_t rslt;
    struct coines_board_info board_info;

    signal(SIGINT, ctrl_c_sig_handler);

    init_bme680_sensor_driver_interface();

    rslt = coines_open_comm_intf(COINES_COMM_INTF_USB);

    if (rslt < 0)
    {
        printf("\n Unable to connect with Application Board ! \n"
               " 1. Check if the board is connected and powered on. \n"
               " 2. Check if Application Board USB driver is installed. \n"
               " 3. Check if Board is in use by another application. (Insufficient permissions to access USB) \n");
        exit(rslt);
    }

    rslt = coines_get_board_info(&board_info);

    if (rslt == COINES_SUCCESS)
    {
        if (board_info.shuttle_id != BME680_SHUTTLE_ID)
        {
            printf("! Warning invalid sensor shuttle. This application will not support this sensor \r\n"
                    "1.Check the sensor shuttle \r\n"
                    "2.Reset the board  \r\n");
            exit(COINES_E_FAILURE);
        }
    }

    init_sensor_interface();

    /* after sensor init introduce 200 msec sleep */
    coines_delay_msec(200);

    init_bme680();

    /* Call to the function which initializes the BSEC library
     * Switch on low-power mode and provide no temperature offset */
    ret_bsec = bsec_iot_init(BSEC_SAMPLE_RATE_LP, 0.0f, bus_write, bus_read, sleep, state_load, config_load);
    if (ret_bsec.bme680_status)
    {
        /* Could not intialize BME680 */
        return (int)ret_bsec.bme680_status;
    }
    else if (ret_bsec.bsec_status)
    {
        /* Could not intialize BSEC library */
        return (int)ret_bsec.bsec_status;
    }

    /* Call to endless loop function which reads and processes data based on sensor settings */
    /* State is saved every 10.000 samples, which means every 10.000 * 3 secs = 500 minutes  */
    bsec_iot_loop(sleep, get_timestamp_us, output_ready, state_save, 10000);

    return 0;
}
Further reads
- Mark as Read
- Mark as New
- Bookmark
- Permalink
- Report Inappropriate Content
Hello,
How to get IAQ level value on the basis of Gas resistance from the function calc_gas_resistance() in bme680?
How to convert?(Gas resistance to IAQ level)
- Mark as Read
- Mark as New
- Bookmark
- Permalink
- Report Inappropriate Content
- Mark as Read
- Mark as New
- Bookmark
- Permalink
- Report Inappropriate Content
Thanks for your response @elrhoul.
Where could I download this object library? Can you give me a link and call the method?
I want to get the IAQ value only,it's a little bit more intuitive.And it's important to me, too. Can you help me?
Looking forward to your reply, thanks very much.
- Mark as Read
- Mark as New
- Bookmark
- Permalink
- Report Inappropriate Content
- Mark as Read
- Mark as New
- Bookmark
- Permalink
- Report Inappropriate Content
Thanks elrhoul. Is that the link below?
But the following library functions were not found when I compiled them . How should I use it?
I just want the IAQ level not the air resistance,but the method of getting IAQ value is not given in the SW library that only get the air resistance.
- Mark as Read
- Mark as New
- Bookmark
- Permalink
- Report Inappropriate Content
Hi, Yes correct it's the right package. Are you linking the right library for your target HW & compiler? Please check the download package are all relevants files for your target compiler/MCU. If you are using Arduino maybe this guide could help you https://github.com/BoschSensortec/BSEC-Arduino-library Regards
- Mark as Read
- Mark as New
- Bookmark
- Permalink
- Report Inappropriate Content
Does the gas sensor/algorithm compensate for humidity levels when outputing the results?
- Mark as Read
- Mark as New
- Bookmark
- Permalink
- Report Inappropriate Content
- Mark as Read
- Mark as New
- Bookmark
- Permalink
- Report Inappropriate Content
Hello:
I've included the file "bme680.c" into my IAR source directory "SRC" and the project, and then added the 2 header files into the "INC" directory, wher IAR expects to find them.
When I try to compile the bme680.c file it has an error:
Fatal Error[Pe003]: #include file "C:\Users\dev\Documents\IAR\LP1\Core\Inc\bme680.h" includes itself C:\Users\dev\Documents\IAR\LP1\Core\Inc\bme680.h
The files were brought in as obtained from github folder.
How to correct this issue?
Thanks.
- Mark as Read
- Mark as New
- Bookmark
- Permalink
- Report Inappropriate Content
I am directly accessing the sensor thrugh spi without using the software libarary and Arduino . is there a manual to use the sensor output data?
Thanks,
- Mark as Read
- Mark as New
- Bookmark
- Permalink
- Report Inappropriate Content
some reference designs (Dev kits, breakout boards, end product, open source software etc) with BME68x:
https://www.onsemi.com/support/evaluation-board/rsl10-sense-gevk
https://www.nordicsemi.com/Software-and-Tools/Prototyping-platforms/Nordic-Thingy-91
https://www.renesas.com/us/en/products/synergy/hardware/kits/ae-cloud2.html
https://www.shiratech-solutions.com/products/bosch-sensor/
https://www.adafruit.com/?q=Bosch
https://www.geniatech.com/product/iot-terminal-museon-1-1/
https://www.dialog-semiconductor.com/products/da14585-iot-multi-sensor-development-kit
https://www.mikroe.com/13dof-click
https://www.mikroe.com/13dof-2-click
https://www.sparkfun.com/search/results?term=bosch
https://shop.pimoroni.com/products/bme680-breakout
http://www.gtcm2m.com/air_quality_sensor_module.html
https://github.com/apache/mynewt-core/tree/master/hw/drivers/sensors
https://github.com/zephyrproject-rtos/zephyr/tree/master/drivers/sensor
- Mark as Read
- Mark as New
- Bookmark
- Permalink
- Report Inappropriate Content
Hi All,
Any idea if this is the same sensor in the Bosch Optiflow Bluetooth edition?
- Mark as Read
- Mark as New
- Bookmark
- Permalink
- Report Inappropriate Content
Hi All,
I use MDK5 software in STM32F4 development version for data monitoring, how to write it?
now there are some problem about it.
- Mark as Read
- Mark as New
- Bookmark
- Permalink
- Report Inappropriate Content
@KingBob In same position. Using an STM32G431 but have already got SPI 'talking' to it. I think you have to write your own functions to provide SPI or I2C access to the BME68x and then apply them by allowing the BME68x_dev structure to access them.
- Mark as Read
- Mark as New
- Bookmark
- Permalink
- Report Inappropriate Content
We have developed a product using this sensor, and it is working as intended. However after seeing data from a product that was stored for a while I noticed the sensor took up to 7 days to "clean" itself and get values up to where they were intended.
Is there a safe heating configuration that can be used to help "burn off" any residue that may have built up in storage, and help get results back to expected values faster?
Still looking for something?
- Top Results


